ShopDreamUp AI ArtDreamUp

Deviation Actions


Suggested Deviants


Suggested Collections


You Might Like…


Description
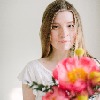
A while back a few expressed they would be interested in seeing how I process my photos. I just had a request on how much I processed this one, so thought I would share this one.
Midnight Sun - [link]
1. The first image is a SOOC (straight out of camera) JPEG. I shoot JPEG + RAW now. I always edit from the RAW file, I keep the JPEGs for quick viewing sake, never edit them. There is a lot more detail retained in a RAW file and allows for more flexibility in processing.
2. The second image is where the majority of the editing was done, in Lightroom. In brief, I bumped up the exposure and added a vignette. For those wanting more detail, here are the adjustments made in Lightroom.
 Adjusted Temperature to make it slightly cooler, 5000K to 4738K. Removed some magenta in Tint slider, brought it from 2 to -7.
Bumped Exposure up +0.76.
Decreased Contrast from +25 to +7.
Slightly decreased Clarity to soften it up -10. This is good in moderation I find, it decreases local contrast. Too much of it and it will look like you used an 80's soft filter.
Increased Vibrance +12. Tip: Always adjust the Vibrance instead of Saturation when possible. You will get a lot more colour and avoid "colour clippings."
Adjusted Tone Curve for additional contrast. Lights +19. Shadows -2.
Added a Vignette in "Lens Correction" to darken the edges to bring more attention to the face. I like to add vignettes through this rather than "Post-Crop." They look natural this way. Amount: -100. Midpoint 18.
Then I exported the image from RAW to JPEG and opened in Photoshop.
3. The final image is after some adjustments and toning in Photoshop. I probably could have done a lot of this in Lightroom too, but I like to work with many adjustment layers. This way I can include or exclude certain parts of the image from certain adjustments. For example, this photo was taken in the evening sunset and I made several levels, curves, and colour balance adjustments. I applied some over the entire image, but didn't apply them at full opacity over the golden light in the upper left. The light there symbolizes the "Midnight Sun" and is important for the cool-warm tone contrast I wanted to create.
Photoshop is where I really feel like an artist. I have tools and brushes. I have the power to not create emotions here, but to emphasize the ones already present in the image. I invest a lot of time in Photoshop picking and choosing the effects I'd like to apply to the image and tweaking them. I probably spent two or three hours on this image in Photoshop, not applying a ton of effects, but making decisions until I was satisfied with the results.
Well, there you have it. How I processed one of my photos in depth. Sorry, I don't have time to make a tutorial with screenshots and all, but hope this helps someone out.
Midnight Sun - [link]
1. The first image is a SOOC (straight out of camera) JPEG. I shoot JPEG + RAW now. I always edit from the RAW file, I keep the JPEGs for quick viewing sake, never edit them. There is a lot more detail retained in a RAW file and allows for more flexibility in processing.
2. The second image is where the majority of the editing was done, in Lightroom. In brief, I bumped up the exposure and added a vignette. For those wanting more detail, here are the adjustments made in Lightroom.
Then I exported the image from RAW to JPEG and opened in Photoshop.
3. The final image is after some adjustments and toning in Photoshop. I probably could have done a lot of this in Lightroom too, but I like to work with many adjustment layers. This way I can include or exclude certain parts of the image from certain adjustments. For example, this photo was taken in the evening sunset and I made several levels, curves, and colour balance adjustments. I applied some over the entire image, but didn't apply them at full opacity over the golden light in the upper left. The light there symbolizes the "Midnight Sun" and is important for the cool-warm tone contrast I wanted to create.
Photoshop is where I really feel like an artist. I have tools and brushes. I have the power to not create emotions here, but to emphasize the ones already present in the image. I invest a lot of time in Photoshop picking and choosing the effects I'd like to apply to the image and tweaking them. I probably spent two or three hours on this image in Photoshop, not applying a ton of effects, but making decisions until I was satisfied with the results.
Well, there you have it. How I processed one of my photos in depth. Sorry, I don't have time to make a tutorial with screenshots and all, but hope this helps someone out.
Image size
1848x900px 880.25 KB
© 2009 - 2024 canuckgurl22
Comments38
Join the community to add your comment. Already a deviant? Log In
Thanks for sharing with us.